
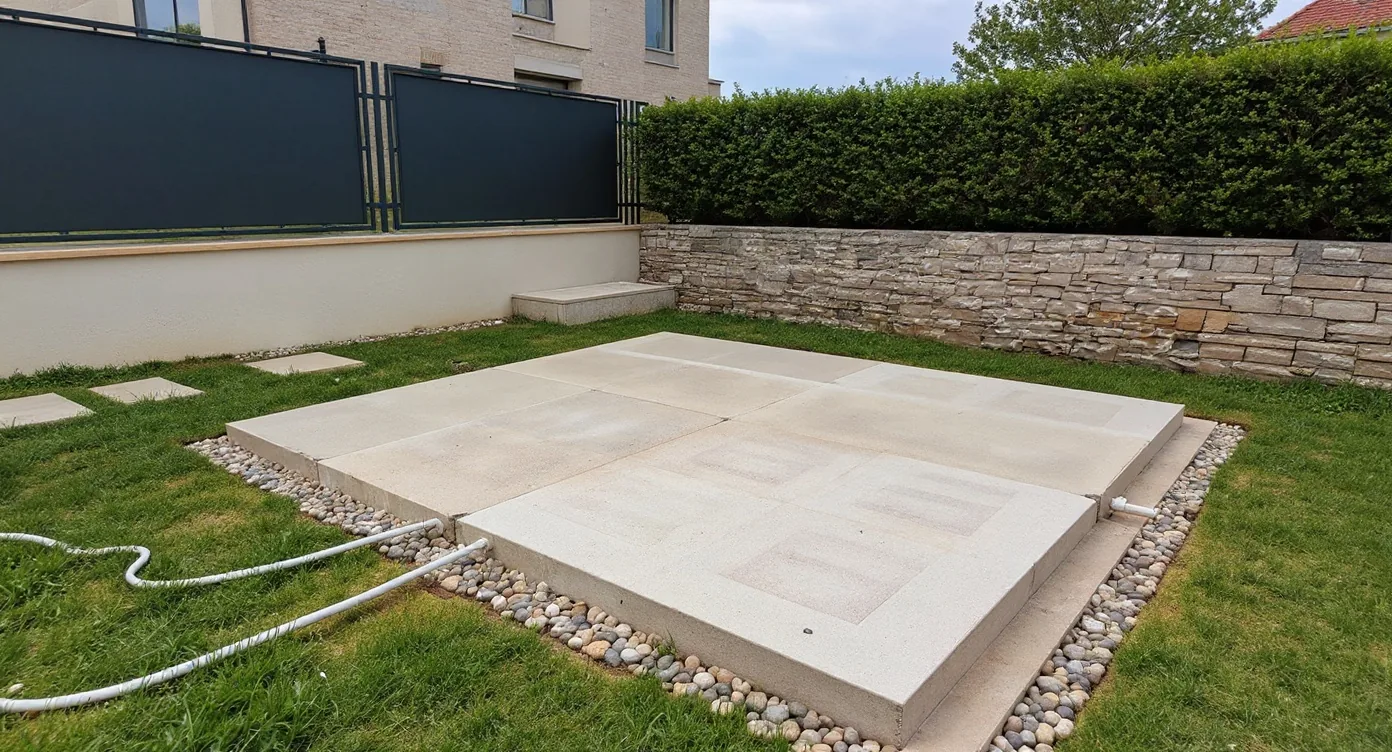
The difference between a sauna used three times per week and a sauna used three times per year rarely lies in the sauna itself. It lies in where it stands, how it is reached, what is seen from it, and how seriously the ground below it has been prepared.
Site preparation is not a phase that precedes the real project. It is the phase that determines whether the project will function after installation. This guide covers what has to be decided, measured and prepared before the sauna arrives on location — from micro-location and microclimate to base, connections, access and cooling zone.
The decision logic around which sauna to choose is explained in How to choose an outdoor sauna. This guide does not repeat that logic — it is about preparing the space.
A good micro-location makes the difference between an object that merely stands in the garden and a wellness space that is actually used. View, access, distance from the house and movement logic. Orientation toward light and wind protection for resting. Greenery, screens, glass and architectural isolation from views. Levelled concrete slab, strip foundations or screw piles. Electricity, water, drainage and preparation according to the technical drawing.Key steps in site preparation
Step 01Micro-location — the decision that comes before everything
The strongest force that determines whether a sauna becomes a ritual or rare recreation is psychological distance. Not physical — psychological.
A sauna that requires a walk across the entire yard in cold, snow or rain gets a seasonal usage pattern. A sauna 8 metres from the kitchen door, with a covered approach, has a chance to become a daily or weekly practice. Weekly protocols and ritual frameworks covered in weekly usage examples depend directly on this — distance changes the feasibility of the pattern.
Practical distance frame:
- Ideal: 5–15 metres from the house entrance — access is natural, the ritual does not require preparation
- Maximum for regular use: 20 metres, with a covered approach
- Above 20 metres: the ritual becomes an "outing", not an everyday practice
The question is not "where is there space", but "where will the ritual function naturally". Those are different questions, and the answer starts from the house, not from the yard.
Movement in the zone should have its own natural flow:
house → sauna → cooling → rest → return
If that flow is not resolved — if one has to cross diagonally across the whole garden from the sauna to the cooling point and then back again to the rest area — the ritual becomes awkward. In a good layout, the cooling zone, sauna and rest area are spatially connected in a triangle with minimal steps.
Step 02Sun, wind and microclimate
A location has its own climate — different from the general forecast area, and different from a point 50 metres away in the same garden.
Orientation toward the sun
Sauna window — best if it faces west or south-west. An outdoor sauna is most often used in the evening, and the view of the sunset during the second and third phase of the ritual is part of the experience. Late-afternoon and evening sun turns sitting in the sauna into something more than a thermal experience.
Cooling zone — here the logic is reversed. Cold plunge, outdoor shower and lounger for rest are ideally positioned with afternoon shade. Sitting on a lounger under strong summer afternoon sun after sauna and cooling is not what the body needs. Shade (from a tree, pergola or covered structure) maintains temperature regulation.
In other words: the sauna faces west, the rest zone is in shade. Not a contradiction — simply different functions require different conditions.
Dominant winds
Wind is the most underestimated factor in outdoor wellness planning. While you are in the sauna, wind is not a problem. The problem starts when you go outside — especially for cold plunge and the rest phase, where a cold draught can turn a ritual moment into a break in practice.
Standard procedure: analysis of dominant wind directions on the location.
- Continental Croatia — north wind, north-easterly (especially cold in winter)
- Coastal belt — bura (north-east), jugo (south-east)
- Open locations — winds can be channelled through passages and valley-shaped terrain
The goal is not to close the space. The goal is to protect the cooling zone from dominant winds using natural shelter (house, garage, existing hedge) or a created windbreak (wooden slats, green pergola, low wall). The rest of the zone remains open — wellness does not want claustrophobia.
Precipitation and seasonality
The sauna roof solves the cabin. The roof of the cooling zone and the approach is a separate project.
A covered terrace between the sauna and the house, plus a covered cooling zone, changes seasonal usability from 7–8 months per year to 12 months. That is the difference between seasonal recreation and a year-round ritual.
Step 03Privacy and view
Ritual requires relaxation. The feeling that the view from a neighbour's window, balcony or street reaches the cooling zone is enough for the sauna to be used rarely — regardless of its quality.
Three approaches to privacy:
- Natural barriers — high hedges (thuja, photinia, cherry laurel, bamboo in planters), strategically planted trees. The softest visual solution, but they need 2–5 years to reach full efficiency. They are planted before sauna installation, not after.
- Architectural partitions — wooden slats, screens, low walls, green pergolas. Immediate result, clear aesthetic presence. They can be coordinated with the sauna material (for example Lunawood slats next to a Lunawood cabin exterior).
- Positioning — the cheapest privacy is correct orientation. Cabin window toward the garden, cabin back toward the neighbour. Often solves 80% of the problem without a single additional element.
The myth of glass privacy
Glass cabin panels do not solve privacy completely.
- During the day, reflective or tinted glass provides one-way visibility — outside has difficulty seeing in, inside sees out.
- In the evening, when the cabin is lit from inside and outside is dark, the effect reverses. A lit cabin facing darkness becomes a display window.
That is why privacy must not be solved only with glass. The best approach is a combination: correct positioning + greenery or architectural partition + glass technology as an additional layer.
View from the cabin
What is seen through the window is part of the experience. A garden with trees, forest, mountain outlines, stone wall, green pergola — all of that works. A view of a fence, waste container or technical zone does the opposite.
If a natural view does not exist, it is created: Japanese garden, focal tree, indirectly lit element, water surface.
Step 04Base — the least visible, most important layer
An outdoor sauna weighs between 1,500 and 4,000 kg in operating mode (structure + water + people). The base has to carry that load without settlement for 20+ years, be perfectly level and drain water.
| Base type | Application | Thickness | Relative cost |
|---|---|---|---|
| Reinforced concrete slab | Standard for most models | 12–20 cm | Medium |
| Concrete slabs on gravel | Smaller saunas (up to 6 m²), without a very heavy heater | 5 cm slabs + 15 cm gravel | Lower |
| Point concrete foundations | Sauna on timber frame, sloped terrain | According to statics | Higher |
| Screw piles | Very sloped terrain, protected land without excavation | According to statics | Highest |
Drainage is the most underestimated criterion
Water from the shower, melting snow from the roof, precipitation — all of that has to drain away. The standard slope of the base is 1–2% toward the drainage point (channel, drainage trench or gravel absorption zone). Without that slope, a damp zone remains under the sauna and undermines the lower structure for years.
Base dimensions
Rule: external footprint of the sauna + at least 20 cm on each side. The sauna does not sit on the edge of the base.
The lower battens of the construction must be fully on concrete, without contact with soil or grass. Space under the cabin (timber frame with ventilation) allows air circulation and drying of condensation — without it, the underside of battens rots despite thermal treatment.
Step 05Electrical and water connections
Connections are laid before the base is installed or through it (planned openings). Later drilling of a finished slab is possible, but that is a compromise avoided whenever possible.
Electrical connection according to heater power
| Heater power | Connection type | Cable (indicative) | Breaker |
|---|---|---|---|
| 6 kW | 3-phase | 5×2.5 mm² | 16 A |
| 9 kW | 3-phase | 5×4 mm² | 25 A |
| 12 kW | 3-phase | 5×6 mm² | 32 A |
| 15 kW + | 3-phase | 5×10 mm² | 40 A and above |
Exact values are always determined according to the specification of the specific heater and the cable run length — the values above are orientation, not regulation. Electricity is dimensioned according to the model technical sheet (HUUM, SIOP, Tulikivi and other manufacturers have different requirements).
Additional circuits
- Cold plunge chiller — single-phase, most often 1–2 kW, separate circuit
- Outdoor lighting — 12 V LED or 230 V LED, separate circuit
- Smart controller / WiFi gateway — usually low-voltage
- Hot tub circulation pump — depends on type, but is planned together with water
Water and drainage
Water supply is needed for an outdoor shower, cold plunge filling, optionally for the BIO system. Standard recommendation: 3/4" pipe with a separate winter valve — the supply must not remain under pressure in winter (freezing destroys valves and joints).
Drainage is mandatory for shower, cold plunge and condensate. Connection to sewage is the most reliable. A drainage system (perforated pipes into a gravel zone) is an alternative for remote locations, but requires dimensioning according to expected water volumes.
All of this goes through excavation before concreting, not after.
Step 06Access for delivery and installation
The most common problem is discovered one month before delivery: how the cabin enters the yard.
Measurements are made before ordering, not one week before delivery:
- Width of entrance gate to the yard (minimum: external cabin dimension + 30 cm)
- Width of passage between house and side fence
- Height of obstacles — wires, branches, fences, low eaves
- Slope of access road (>15% requires special measures)
- Load-bearing capacity of access surface — parked street, gravel road, grass surface
Delivery modalities
- Entire cabin in one piece — fastest installation on location, requires the widest access. Typically by trailer and manually across a paved path.
- Modular assembly (panel assembly on site) — slower, but solves inaccessible locations. The KUBIQ 162 mm prefabricated panel system allows this approach for most models.
- Roof delivery by crane — when ground access does not work. Cost depends on crane hourly rate and access — a significant item, but the only option for some locations (narrow passages, terraces behind the house, gardens surrounded by inaccessible fences).
A good project does not end with design. It has to be executable on the real location.
Step 07Cooling and rest zone — integral part, not an add-on
A sauna without an outdoor cooling zone is not an outdoor sauna — it is a sauna moved into the yard. True outdoor character comes from the outdoor space between cabin entries.
The mechanics of contrast therapy (vasodilation → vasoconstriction → recovery) are explained in contrast therapy. What matters here is that the second phase of the ritual — cooling and rest — does not happen in the sauna. It happens outside. And that place is planned at the same time as the sauna.
Composition of the cooling zone:
- Outdoor shower or cold plunge — direct cooling function
- Seat or lounger — second cooling phase, pulse regulation, autonomic reset
- Covered space — at least for one seat, so rain does not interrupt the ritual
- Water and towel within reach — without returning to the house
Minimum area of the cooling zone: 6–8 m² next to the cabin. Less than that means the second phase of the ritual does not happen comfortably — which directly affects how often the sauna is actually used.
Principle: the cooling zone is planned at the same time as the sauna, not after the sauna has been installed.
Step 08Minimum viable wellness zone
Not every location allows an optimal layout. Real questions that appear in practice:
What if the garden is small?
Sauna 2×2 metres + cooling zone 2×3 metres = 10 m² total wellness footprint. Enough for solo and couple practice, not enough for a family. If the yard is even smaller, one considers a sauna on the terrace (with reinforced structural capacity) or a sauna in a canopy.
What if three-phase power is not available?
6 kW heater on single-phase power (16 A breaker) — limits to a cabin of 4–6 m³. Alternatives: investment in a three-phase connection (varies according to distance from the cabinet), or a wood-burning heater, which solves the electrical issue but opens the regulatory question of the chimney.
What if an outdoor shower is not possible?
An outdoor shower bucket (10–15 L of cold water) as a replacement. Works for solo practice, not for couple use. Less elegant, but the ritual works.
What if the location has no natural privacy?
A 1.8 m high wooden slat screen as an immediate partition, while greenery is planted in parallel as a long-term solution. In 3–5 years the greenery takes over the function, the slat screen becomes an additional element or is removed.
A wellness zone does not have to be ideal to function. It has to be consciously compromised, not improvised. That is the difference.
When location, orientation and infrastructure are correctly defined, your KUBIQ sauna becomes a natural part of the environment and everyday enjoyment. Send us your plan and together we will create your ideal outdoor wellness zone — from micro-location to final integration.Good planning = better ritual
Frequently asked questions
Is a building permit required for a sauna in the yard?
It depends on the type of object and local regulation. A standard prefabricated sauna on a concrete base, without fixed construction, is most often an auxiliary object that does not require a permit. There are exceptions for protected areas, certain floor areas and specific locations. Checking with the local administrative department before ordering is the standard recommendation.
How long does site preparation take?
Complex preparation (excavation, drainage, installations, concrete slab, concrete curing time) — 3–4 weeks. Simple preparation (existing level slab, built connections) — 1–2 days of checking and adaptation. Concrete curing time is not accelerated — 28 days is the standard before full load-bearing capacity.
Can I use an existing terrace as a base?
It depends on load-bearing capacity and levelness. A wooden terrace is usually not load-bearing enough for a full-mass sauna. A concrete terrace can work with verification of thickness, reinforcement and drainage — structural verification is a mandatory step.
What if the terrain is sloped?
Point foundations or screw piles are the standard solution for sloped terrain. The sauna is placed on a levelled platform (timber frame on piles), not on a sloped surface. Levelling has to be at zero.
Does the sauna need ventilation around it?
Yes. The minimum distance from side and rear obstacles (wall, fence) is 50 cm. Below the cabin — wooden battens with spacing for air circulation and condensation drying. Without that, moisture is retained and construction aging accelerates.
Can connections be routed above ground?
Technically yes, aesthetically rarely. Standard practice is that all connections run underground to the sauna base, and only the transition from ground into the cabin is visible. Above-ground installation disrupts the aesthetics of the outdoor wellness zone and is more often a source of damage-related problems.
Next step
Site preparation is not planned after the sauna has been ordered. It is planned at the very beginning — often months before ordering.
KUBIQ Studio analyses micro-location, movement flow, base, installations, wind, privacy and integration of the object into the space — as the first step of every premium project, before the model of the sauna is even discussed.
Talk to the KUBIQ Studio team →
A bespoke wellness zone does not start from the sauna. It starts from the space.